Tackling The Seats On My 1929 Graham Paige Part 1
March 25, 2021Tool Review – Drill Bit Sharpener
October 29, 2020I really like this drill bit sharpener. And it wasn’t expensive either!
Graham Paige Brakes
October 29, 2020Finally got the hydraulic brakes working on the Graham!
Restoring a Steel Cabinet
October 14, 2020I always wanted to have a big steel cabinet for the garage. I found one on Kijiji and in this video I strip the decals off it and give it a great paint job.
Built-In Knife Block
June 11, 2020We don’t have room on the kitchen counter for a knife block so I invented a built-in one.
Tandem Bike Restoration Part 2
April 26, 2020Tandem Bike Restoration Part 1
April 26, 2020Fixing My Grass Trimmer Part 2
April 26, 2020Success! I restored my older trimmer, saved money, and learned about batteries in the process…
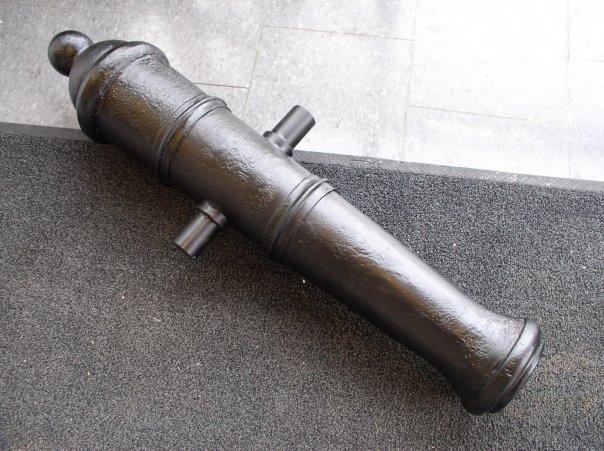
How to Build a Realistic Cannon
June 7, 2013Hi guys. This is PART 1 of how to make a cannon that looks like this…
PART 1
For this project, you’ll need a cardboard tube. The kind they sell at Rona or Home Depot for pouring concrete into. The size you buy is up to you. I think they range from 6″ up to 10″ in diameter, so you could make a small or fairly large cannon.
You’ll also need a plastic bowl that’s the same diameter to fit on the back, a length of ABS tubing to form the inside of the barrel, and some 1/2″ pink or blue styrofoam.

The basic shape of the cannon body is a tube, but as you can see, you need to get it to taper down at the front. It might be helpful to get a picture of a cannon you like and use a computer program like photoshop to draw a grid and rulers over it to get the proper dimensions. There’s no exact shape that’s perfect, it’s up to you.

Okay, in order to get the tube to taper, you’ll need to remove a pie shaped wedge the whole length of the tube. Draw a line straight down the length of the tube. At one end, measure out an inch (or more if you want more taper) on each side of the centerline and make a point. Now draw lines connecting both these points with the centerline at the other end of the tube. This gives you a long pie shaped piece that you need to cut out. Use a sharp utility knife and a metal yardstick to cut out the pie shaped section. Keep it though, you’ll need it soon.
The real bugger now is to get the tube pushed inwards so that the two cut ends meet. I tried taping it…no good. The only thing I found that works is to take the discarded piece of wedge shaped cardboard and glue it inside one of the cut sides with about an inch sticking out, wait for it to dry, and then push the two sides together and hold it together with small bolts and glue. If someone comes up with a better method of joining the two sides, please let me know.

Once you get the tube glued into the proper tapering shape, you’ll notice the two ends are not “square” with the length of the tube any more. You can wrap a piece of paper or length of cardboard around the tube at both ends as a guide, then mark a line to “square up” the ends, and cut them with a utility knife.

Whew. Now you have the proper tapering tube.
In the next part, I’ll explain how to make the most challenging part, but the part that really sells it. The muzzle.
Thanks for you kind words and good luck, Mateys. Arrrrrrr.
PART 2
If you read the first part of my thread, you know we’re working on a realistic but lightweight cannon like this…

We’ve already made the body of the cannon, a tapering cardboard tube, now we’re going to form the muzzle section.
I puzzled over this for while before coming up with this solution. Pink foam. It’s the best stuff for making props and it’s cheap.
Basically, the muzzle is a series of donut shaped pieces of foam stacked over a lenth of ABS tubing. The inside of the donuts is the exact diameter of the tube, but the outside varies to give the muzzle it’s characteristic flared shape.

It’s best to slide all your sections of pink foam onto the tube while the tube is standing up. This way, they all go on nice and square. You can use foamboard adhesive, available where you buy your pink foam, to glue it all together.
Now the fun part. You want to muzzle to have a nice smooth shape. But the pieces of foam are square sided. The best way to shape it is to spin the whole thing. Like you would on a lathe.
I figured out that if I hot glued a temporary plug of wood in each end of the pipe, then drilled a hole exactly through the center, I could insert a dowel that would act as my lathe.

I just attached one end of the dowel to my drill, clammed the drill down, inserted the other end of the dowel into a piece of wood with a hole in it that I also clamped down, and spun the whole thing. It works great!!!! All you need is some course sandpaper and gentle pressure and you can shape the foam perfectly as it spins. It might take some trial and error, but the raw material is cheap.

Once you get it looking smooth and the shape you want, insert it into your cardboard tube at the narrow end to test the fit. It should fit nice and snug into the tube. If it’s too big, just sand it more.

Once you’ve got it, take out the two wooden plugs, squirt some latex caullking around the are where the ABS meets the foam, and the muzzle is ready to be glued in.
One thing though. The length of ABS might need a support inside the tube, especially if you’ve kept it long. The best thing to do is cut a support disc and glue it inside the tube.
Next, we’ll talk about how to add more details to the cannon.
Arrrrrrrrrrrr…..
PART 3
Here with go with more details on the “Geoff design” cannon:

You already have the tapering cardboard tube and the muzzle section done. The rear rounded part of the cannon is simply a plastic bowl! I managed to find one in the dollar store that was the exact size the the cannon at the back. It even had a flat bottom that allowed a plastic ball to epoxied onto it.

I wanted a “steel band” around the back of the cannon between the bowl and the tube. This was just another disc of pink foam that I sanded to be more rounded on the edges.
The “stanchions” or posts that come out of the side of the cannon were sections of ABS pipe. I carefully cut a hole in the cardboard tube on both sides and slid the pipe through. Note: if your ABS muzzle tube goes down the cardboard tube too far, you won’t be able to have the stanchions go all the way through the body of the cannon. In my opinion, it’s better to make the muzzle tube a bit short so the stanchions go right through the cardboard tube are good and sturdy.
The “reinforcing bands” going around the cannon are just strips of heavy cardboard (I used another builder’s tube for strips) glued into place. To give it some extra shape and dimension, I even wrapped some plastic piping around the center of each band, and then blended it in with latex caulking.
Caulking. Caulking. Great stuff. Use it wherever there’s gaps and cracks. Who cares what it looks like unpainted because the next step is…
You guessed it…
Finishing.
Arrrrrrrrrrrrr…..
PART 4
Ahoy mateys. Good to see you again.
Now we’re going to make your cannon come to life. Sure, it just looks like a pile of cardboard and foam (and it is), but soon your friends and enemies will gasp in terror and delight. Because of paint.

I like to make my props rather durable so I can use them again and again. So I decided to coat the entire thing with several layers of water based polyurathane. I use water based stuff because anything oil based will probably eat your cannon like acid before your horrified eyes.
After I gave it a protective coat, I sprayed the entire thing with a satin black paint.
AND WAS REALLY DISSAPOINTED.
I mean, it looks okay I guess. But it just didn’t sell as cast iron. What was missing was some SURFACE TEXTURE.
So here’s how I added some. Get some lightweight wall spackling and a sponge. Use the sponge to gently stipple the spackling all over the body of the cannon. You don’t have to put it on thick or evenly. You’re trying to make the surface just look rough.

Now your cannon looks like it’s got some horrible skin disease, but that’s what you want. Now take some medium sandpaper and GENTLY start to “knock down” the bumpy texture of the spackling. The idea is to get it so it just barely is there. This will give the impression that the texture is eating INTO the surface, like a real cast iron cannon would.
Now you can re-coat the whole shebang with several coats of water based urethane again to seal it and once again spray it black.
DAVY JONES LOOKOUT!!!!!

Now it looks real!!!!!!!!!!!! (insert more exclamation marks here)
Once it dries, get a friend and carry it to work, acting as if it weighs hundreds of pounds. Then hurl it at some unsuspecting guy and watch him have a heart attack. (okay I did this and it was funny but I don’t recommend it).

Your cannon will impress everybody except your mom.
Next, I have to build a carriage for the darned thing out of 2X6s.
Thanks for reading my posts and good luck.
Cap’n Geoff